Try the Pearl Glaze Nail Trend for the Dreamiest Summer Manicure
A little piece of the ocean, everywhere you go.
There is a specific kind of quiet that only exists at the edge of the water just before the sun begins its slow descent. It is the feeling of warm, salt-heavy air clinging to your skin and the rhythmic, hypnotic pull of the tide against the sand. You might find yourself sitting on a weathered boardwalk, the scent of coconut sunscreen lingering in the breeze, watching the light catch the crest of a wave and turn it into something that looks less like water and more like liquid silver.
While you may be navigating a morning commute or sitting at a desk rather than drifting along a coastline, you can carry that exact sense of soft, oceanic light with you. The Pearl Glaze trend allows you to translate that ephemeral, seaside magic into something you can see every time you reach for your coffee or turn a page in a book.
The transition from the structured, minimalist aesthetics of recent years to something more fluid and romantic marks a shift in how we approach personal style. For a long time, the focus has been on the sharp, clean lines of the “clean girl” aesthetic—neat, predictable, and often quite matte or satin in finish. Pearl Glaze nails move in the opposite direction, embracing translucency, movement, and a sense of organic imperfection.
What Are Pearl Glaze Nails?
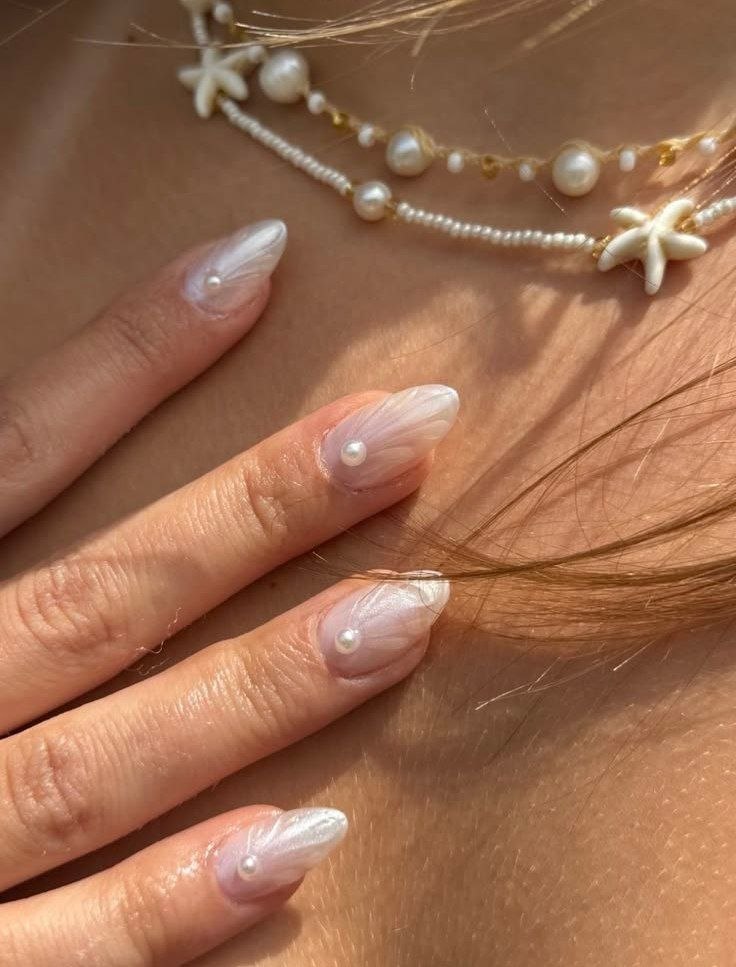
Pearl glaze nails consist of a semi-translucent, milky-pink or nude jelly base that provides a soft, sheer depth. A pearlescent or iridescent finish is applied over the base to create a shimmering, light-reflective surface. The design is completed with fine, white line art that mimics the organic shapes of sea foam or moving water, finished with a single, small 3D pearl accent placed near the cuticle or the center of the nail plate.
Behind the Trend
This trend is resonating because it feels less like a costume and more like a mood. We are seeing a move away from the high-contrast, heavy chrome finishes that defined the previous season. While chrome can feel industrial and bold, pearl finishes feel soft and approachable. It is a pivot from the “metallic” to the “iridescent,” favoring a glow that looks like it is coming from within the nail rather than sitting harshly on top of it. There is a certain nostalgia here, too—a nod to the seashell collections gathered on childhood beach trips and the romanticized, ethereal imagery of mermaid folklore that has long been a staple of summer dreaming.
By blending the sheer, “quiet luxury” feel of a nude manicure with the tactile, decorative elements of pearl embellishments, the look satisfies two different desires: the need for something that looks polished and professional, and the desire for something that feels whimsical and creative. It sits in that sweet spot between a standard salon service and a piece of fine jewelry.
How to Get Pearl Glaze Nails
Achieving this look at home or in a salon requires a focus on layering and light. You should begin with a base of jelly polish in a sheer, milky pink or a pale, translucent peach. The key to the “jelly” effect is to avoid full opacity; you want your natural nail bed to be visible through the color, creating a sense of depth that mimics sea glass. Apply two thin coats rather than one thick one, as this ensures the color remains even and prevents any unwanted pooling in the side walls.
Once your base is set, you will want to introduce the shimmer. You can achieve this using a pearlescent top coat or by buffing a fine iridescent powder into the surface of the color. If you use a powder, work in small sections to ensure the shimmer is distributed evenly across the entire nail. The goal is a continuous, soft glow that shifts slightly as you move your hands, rather than a concentrated glitter effect. This layer provides the canvas for your delicate line work.
For the organic, watery details, you will need a very fine detail brush and a highly pigmented white gel or polish. Instead of drawing rigid shapes, allow your hand to move with a light, sweeping motion. Aim for wispy, curved lines that look like the crest of a wave or the trailing edges of foam. These lines do not need to be symmetrical or perfect; in fact, the more they look like natural, flowing currents, the more authentic the manicure will feel. Let these lines overlap slightly to create a sense of dimension.
The final, defining step is the placement of the pearl. You will need a small, half-sphere faux pearl and a clear, high-viscosity builder gel. Place a tiny bead of the builder gel near the cuticle or slightly off-center on the nail, then gently press the pearl into the gel. This ensures the pearl stays securely in place while the clear gel creates a seamless transition between the embellishment and the nail surface. Once the gel is cured or dry, finish with a high-shine top coat to seal everything in, ensuring the light travels smoothly across both the polish and the pearl.
If you find yourself wanting to push the look even further, try a variation that incorporates a touch of gold leaf or a very fine gold shimmer within the white lines. This adds a sun-kissed warmth to the cool, oceanic tones, making the manicure feel even more suited to the peak of the summer season.