Dazzle Dry Nail System Review: Long-Lasting Salon Nails Without UV Lamps
Dazzle Dry Nail System Review: The Secret to Long-Lasting, Salon-Quality Nails at Home
Introduction
Finding the perfect balance between the durability of gel polish and the ease of traditional nail lacquer is a constant struggle for beauty enthusiasts. Many of us love the high-shine, chip-resistant finish of gels, but the damage caused by UV lamps and the grueling process of acetone soaking can leave natural nails brittle and thin. This is where the Dazzle Dry nail system enters the picture.
Unlike traditional polishes that require multiple coats and long drying times, or gels that require a curing lamp, Dazzle Dry positions itself as a professional-grade, air-dry system. Having researched this kit—which includes everything from preparation to removal—I wanted to dive deep into whether this five-step process actually delivers on its promise of longevity without the damage.
Key Features
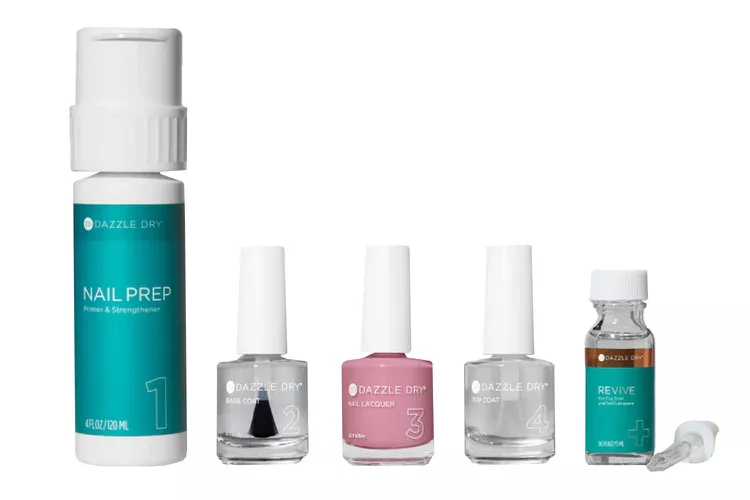
The Dazzle Dry system is structured as a sequential process, clearly numbered on the bottles to ensure the user doesn’t miss a critical step.
Step 1: Nail Prep (Primer & Strengthener)
The foundation of the system is the Nail Prep. Coming in a generous 4fl oz (120ml) bottle with a convenient pump dispenser, this isn’t just a cleaner. It serves as both a primer and a strengthener. Its primary job is to remove oils and impurities from the nail plate, which is essential for the polish to adhere properly and last for weeks rather than days.
The Three-Step Color Process
Once the nail is prepped, the system follows a classic layering technique:
- Base Coat (Step 2): Provides a smooth surface and prevents staining of the natural nail.
- Nail Lacquer (Step 3): The pigment layer. Dazzle Dry lacquers are designed to be high-pigment and fast-drying.
- Top Coat (Step 4): This seals the color and provides the signature high-gloss finish that mimics a gel manicure.
The Revive Remover
The system concludes with “Revive,” a specialized remover designed specifically for the Dazzle Dry base and lacquer. Unlike harsh acetone removers that strip the nail of moisture, Revive is formulated to remove the product while maintaining the health of the nail.
Design & Application/Wear Quality
From a design perspective, the system is incredibly intuitive. The numbering (1 through 4) takes the guesswork out of the application. The Nail Prep bottle is particularly well-designed; the pump allows for a quick, hygienic application without having to fumble with a cap every time you switch fingers.
In terms of application, the lacquer is designed for efficiency. Because the formula is more concentrated than standard drugstore polish, you generally need fewer coats to achieve full opacity. The “wear quality” is the standout feature here. While traditional polish often starts to chip at the edges within three to five days, this system is engineered for long-term wear. Because the Nail Prep creates such a strong bond between the nail and the base coat, the polish resists lifting and chipping significantly longer than standard air-dry options.
What Customers Are Saying
After synthesizing feedback from a wide range of users across social media and retail platforms, a very clear consensus emerges.
The most recurring theme is a sense of relief regarding nail health. Many users report that their nails felt stronger after switching to this system, specifically praising the “Revive” remover for not leaving their cuticles dry or white. The longevity is another major point of praise; many people are surprised that a polish that doesn’t require a UV lamp can last for two weeks or more without significant wear.
However, the feedback isn’t without some caveats. A common point of contention is the strictness of the preparation phase. Some users mentioned that if they skipped the Nail Prep step or didn’t apply it thoroughly, the polish chipped almost immediately. There is a general agreement that while the system is “easier” than gel, it is more demanding than a simple one-coat polish application. A few users also noted that the specialized remover, while gentler, can be more expensive than bulk acetone.
Pros & Cons
- Pros
- No UV or LED lamp required for curing.
- Significantly longer wear time than standard nail polish.
- Includes a strengthener and a gentle remover to promote nail health.
- High-pigment colors that offer great coverage.
- Intuitive, numbered system that is easy for beginners to follow.
- Cons
- The multi-step process takes more time than a quick polish change.
- Longevity is heavily dependent on the “Step 1” prep process.
- Requires a specific remover for the best results.
Who It’s For
This system is an ideal choice for the “gel-curious” person who is terrified of nail damage. If you have thin, peeling nails but crave the look of a professional manicure, the strengthening properties of the Nail Prep and the gentleness of the Revive remover make this a safe bet.
It is also perfect for the busy individual who doesn’t have the time to visit a salon every two weeks but wants a manicure that lasts just as long. However, if you are someone who changes your nail color every two or three days, this system might be overkill, as it is designed for long-term wear rather than frequent changes.
Final Verdict & Tips
Overall, the Dazzle Dry system is a powerhouse for anyone looking to bridge the gap between traditional polish and gel. Its value lies not just in the color, but in the holistic approach to nail care—starting with strengthening and ending with a non-drying remover. It effectively removes the “danger” of the UV lamp while keeping the “luxury” of a long-lasting finish.
To get the absolute best results from this system, here are my top research-backed tips:
- Never Skip Step 1: The Nail Prep is the most important part of the process. Ensure your nails are completely free of oils and dust before moving to the base coat, or you will sacrifice the longevity of the manicure.
- Apply Thin Layers: To avoid bubbling and to speed up the air-drying process, apply the lacquer in thin, even coats rather than one thick layer.
- Seal the Edge: When applying the top coat, make sure to “cap the edge” of your nail (running the brush along the very tip of the nail). This prevents the polish from lifting at the ends.
- Use Revive for Removal: Avoid using generic acetone removers if you want to maintain the strengthening benefits of the system. Use the Revive remover to keep your nail beds hydrated.