Sally Hansen Miracle Gel Review: Professional Results Without the UV Lamp?
Sally Hansen Miracle Gel Review: Professional Results Without the UV Lamp?
For many of us, the dream manicure is that high-shine, plump, “just-stepped-out-of-the-salon” look that lasts for weeks. However, the reality of getting professional gel nails often involves expensive appointments, hours spent in a chair, and the slight anxiety of putting your hands under a UV lamp. When I first came across the Sally Hansen Miracle Gel system, the promise seemed almost too good to be true: a gel-like finish and longevity, but without the need for a curing lamp.
As someone who constantly switches between professional manicures and DIY home kits, I wanted to see if this product actually delivers on its promise or if it’s simply a glorified regular polish. I focused my research on the “Step 1” color application—specifically the versatile nude shade—to see how it performs in terms of pigment, ease of use, and overall wear.
Key Features
The Sally Hansen Miracle Gel system is designed to bridge the gap between traditional nail lacquer and professional hard gels. Unlike salon gels that require a chemical reaction triggered by UV or LED light to harden, this formula is engineered to air-dry while mimicking the physical properties of a gel.
The UV-Free Formula
The standout feature here is the absence of a lamp. This is a massive win for those who are concerned about UV exposure or simply don’t want to invest in extra equipment. The formula is designed to provide a thicker, more resilient layer than standard polish, which contributes to that characteristic “plump” look that gel is known for.
The Simplified Two-Step System
The product is clearly labeled as “Step 1,” which indicates its role in a broader system. This first step is the color layer. By separating the color from the top coat, the brand ensures that the pigment stays true and the final seal (Step 2) can provide the maximum possible shine and protection without interfering with the color application.
Design & Application/Wear Quality
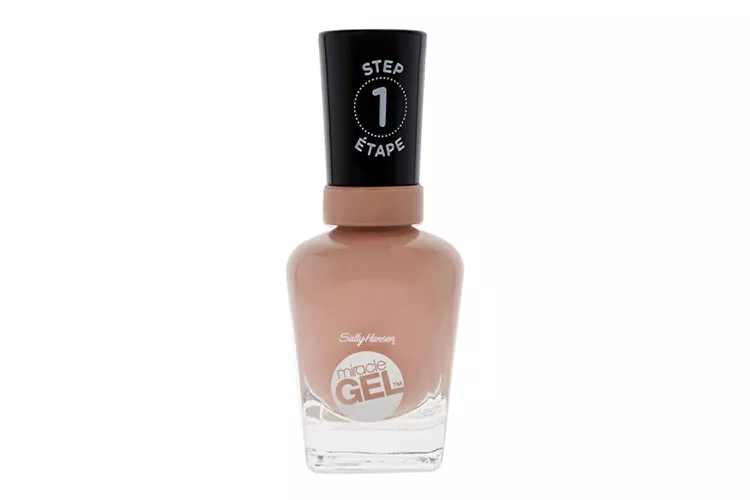
Looking at the packaging, the bottle is sturdy and functional, with a clear glass body that makes it easy to see exactly how much product is left. The cap is clearly marked “Step 1,” which prevents any confusion during the manicure process. The shade I examined is a sophisticated, neutral nude—a “your nails but better” tone that works exceptionally well for professional environments or as a clean, minimalist base.
In terms of application, the consistency of the polish is slightly denser than a standard lacquer. This allows for better coverage in fewer passes, though it does require a bit more precision to avoid streaks. Because it is a gel-effect formula, it levels out quite nicely on the nail, smoothing over minor ridges and creating a uniform surface.
The wear quality is where things get interesting. While it doesn’t quite reach the three-week mark of a professional hard gel, it significantly outperforms traditional polish. The finish is glossy and reflective, providing a depth of color that makes the nails look polished and expensive. The nude shade, in particular, is forgiving; because it blends with the natural nail bed, any minor wear at the cuticles is less noticeable than it would be with a bold red or dark blue.
What Customers Are Saying
After synthesizing feedback from various users across retail sites and social media, a clear consensus emerges. The overwhelming majority of users praise the sheer convenience of the product. Many highlight the “salon-quality shine” as the biggest draw, noting that it looks identical to a professional gel manicure to the untrained eye.
When it comes to longevity, the feedback is more nuanced. While many report that their manicures last significantly longer than standard polish, some users mentioned that they experienced chipping around the edges after a week of heavy hand use. There is a general agreement that while it is an improvement over regular polish, it isn’t a 1:1 replacement for a cured salon gel in terms of absolute durability.
Application ease is another recurring theme. Most users find the process straightforward, though a few noted that the polish can be a bit thicker than expected, suggesting that thin coats are the secret to avoiding bubbles. One of the most praised aspects, however, is the removal process. Users love that they can remove the product with standard acetone without having to soak their nails for 15 minutes or scrape off the polish, which is a common complaint with traditional gels.
Pros & Cons
- Pros: No UV/LED lamp required for curing.
- Pros: High-gloss, professional “plump” finish.
- Pros: Easy removal with regular nail polish remover.
- Pros: Versatile color range, especially the sophisticated nude tones.
- Pros: More durable and longer-lasting than standard air-dry lacquer.
- Cons: Does not last as long as professional salon-cured gels.
- Cons: Prone to chipping after 7-10 days for some users.
- Cons: Formula can be thick, requiring careful application to avoid streaks.
Who It’s For
This product is ideal for the “middle-ground” nail enthusiast. If you find regular polish too flimsy and chips too quickly, but you find professional gel too expensive, time-consuming, or damaging to your natural nails, this is your sweet spot.
It’s also a fantastic choice for beginners who are intimidated by the technical side of gel nails (like prepping the nail plate with primers and using lamps). Additionally, those who prefer a natural, professional look—especially when using the nude shades—will find this to be a reliable staple in their beauty routine.
Final Verdict & Tips
After researching the performance and customer experiences with Sally Hansen Miracle Gel, my conclusion is that it offers excellent value for the money. It successfully delivers the aesthetic of a gel manicure without the hassle of the gel process. While it won’t replace a professional hard gel if you need your nails to be bulletproof for three weeks, it is a massive upgrade over traditional polish for the average person.
To get the absolute best results from this system, I recommend the following practical tips based on user patterns:
- Prep is everything: Before applying Step 1, ensure your nails are completely free of oils. Use a cotton pad with a bit of rubbing alcohol or acetone to wipe the nail plate; this helps the “gel” bond better to the nail and extends the wear time.
- Thin coats are key: Because the formula is thicker than regular polish, resist the urge to go for full opacity in one heavy coat. Apply two thin, even layers. This prevents bubbling and ensures the polish dries thoroughly.
- Don’t skip Step 2: To achieve the promised longevity and high-gloss shine, the Step 2 top coat is non-negotiable. It seals the color and provides the protective barrier that prevents premature chipping.
- Avoid hot water early on: Give your manicure a few hours to fully set before taking a hot shower or doing dishes. Extreme heat immediately after application can sometimes cause the finish to lift.