Try the 3D Flower Accent Trend for the Brightest Spring Manicure
A tactile way to welcome the thaw.
There is a specific, fleeting sensation that comes with the first truly warm afternoon of the year. It is the smell of damp earth turning to dust under a midday sun, the feeling of a light linen shirt catching a breeze, and the way the light turns a particular shade of honey-gold as it filters through new leaves. It is a moment that feels heavy with possibility, a sensory signal that the long, quiet stillness of winter has finally broken.
You are likely not currently lounging in a wildflower meadow or sitting in a sun-drenched garden, perhaps instead navigating a morning commute or settling into a workspace. However, you can carry that sense of seasonal renewal with you through a small, intentional detail. Bringing a touch of that organic, blooming energy to your fingertips is a simple way to signal your own internal shift into spring.
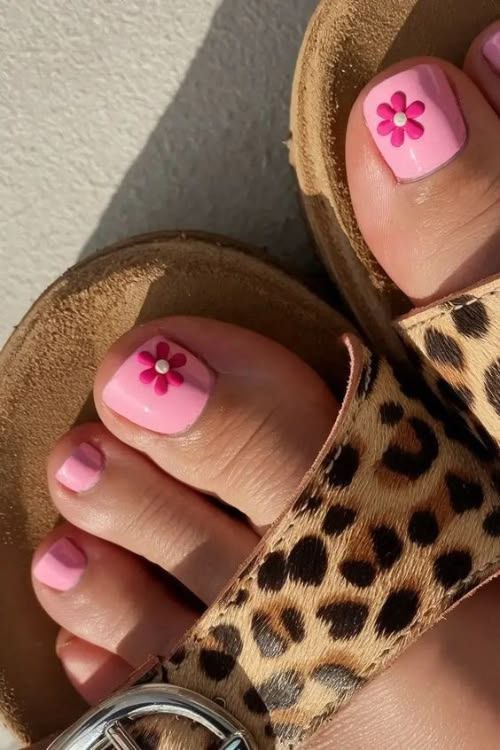
The most effective way to capture this mood right now is through 3D flower accents. Rather than relying on flat, painted designs, this look uses physical dimension to mimic the way petals actually sit in the world—layered, rounded, and textured.
What Are 3D Flower Accent Nails?
3D flower accent nails are a manicure technique that moves beyond two-dimensional art to create sculptural, raised elements on the nail surface. Instead of using standard pigment to draw a flower, this method employs high-viscosity builder gels or specialized sculpting gels to physically construct petals. The result is a tactile finish where the floral designs possess actual height and shadow, creating a sense of depth that changes as you move your hands through the light. The base is typically a smooth, opaque, or semi-sheer color, providing a clean canvas for the textured, three-dimensional botanical elements to stand out.
Behind the Trend
For much of the past year, the prevailing aesthetic in nail design has leaned toward the “clean girl” philosophy—think sheer nudes, milky whites, and perfectly manicured but essentially invisible finishes. It was a period of minimalism, focusing on smoothness, shine, and a certain frictionless elegance. While that look remains a staple for its understated nature, there is a palpable shift occurring toward something more expressive and, quite literally, more touchable.
The rise of 3D florals marks a departure from that quiet minimalism and a move toward a more whimsical, maximalist approach to self-expression. It taps into a desire for texture in an increasingly digital world; there is a certain psychological satisfaction in seeing—and feeling—shapes that have a physical presence. This trend also leans into the romanticism of the “coquette” aesthetic, which favors soft colors and hyper-feminine motifs, but it does so with a modern, artisanal edge that feels less like a costume and more like a piece of wearable art.
There is also a strong element of nostalgia at play here. The trend evokes the playful charm of childhood sticker books or the delicate, raised textures found in vintage botanical illustrations. It feels personal and handcrafted, a stark contrast to the ultra-smooth, factory-perfect finishes that dominated recent trends. By choosing something with a bit of “bump” and character, you are moving away from the idea of the manicure as a mere grooming task and toward seeing it as a medium for small, joyful decorations.
How to Get 3D Flower Accent Nails
Achieving this look requires a bit more patience than a standard polish application, but the tactile result is well worth the extra steps. To begin, you need a solid, even base. Start with a high-quality colored polish or a gel polish in a soft pastel shade—think petal pink, lavender, or a pale butter yellow. This base should be completely smooth and fully cured before you attempt any sculptural work, as any bumps in your base color will be magnified by the 3D elements you add on top.
The core of this technique relies on a high-viscosity builder gel. Unlike standard top coats which are designed to level out and become flat, a builder gel is thick and holds its shape. This is essential for creating the “lift” required for the petals. Using a fine-tipped detail brush, take a small amount of the builder gel and begin to dot it onto the nail in a circular or petal-like pattern. Do not be afraid to build the height; the goal is for the gel to sit proudly above the surface of the nail. You may find that working in small increments is more effective than trying to create a large flower all at once.
Once you have sculpted your petals, you will need to cure the gel under a UV or LED lamp to set the shape. If you find the gel is spreading too much before it cures, try a slightly thicker variety of sculpting gel, or work on one petal at a time. After the petals are set, you can add the finishing touch to the center of your flower. A small, half-pearl charm or a tiny, rounded bead of gel can serve as the stamen, adding one more layer of dimension to the design. For a truly seamless look, use a very thin layer of a non-wipe top coat, but be careful not to use so much that it fills in the gaps between your sculpted petals. You want to seal the design without losing the sharp, defined edges of your floral work.
If you find the traditional floral look a bit too soft for your personal style, you can easily adapt the technique. Try using a metallic or chrome powder over your cured 3D petals to create a striking, liquid-metal effect that feels much more modern and edgy against a matte base color.