Try the Electric Negative Space Trend for the Brightest Summer Manicure
A vivid pop of color that feels fresh all season.
The air carries the heavy, sweet scent of overripe peaches and salt spray. You are sitting on a weathered wooden porch, the kind that feels warm beneath your feet even after the sun has begun its slow descent. A glass of iced tea sits nearby, sweating beads of condensation that trail down the side like slow, clear tears. Everything about the afternoon feels saturated—the sky is a deep, bruised indigo, the greenery is a lush, impossible emerald, and the light is so thick it feels like you could reach out and grasp it.
While you might not be sitting on a sun-drenched porch in the middle of a heatwave, you can certainly carry that sense of high-definition color with you. There is a way to bottle that feeling of intense, summer saturation and wear it on your fingertips, providing a sharp, bright contrast to the softer tones of your daily life.
What Are Electric Negative Space Nails?
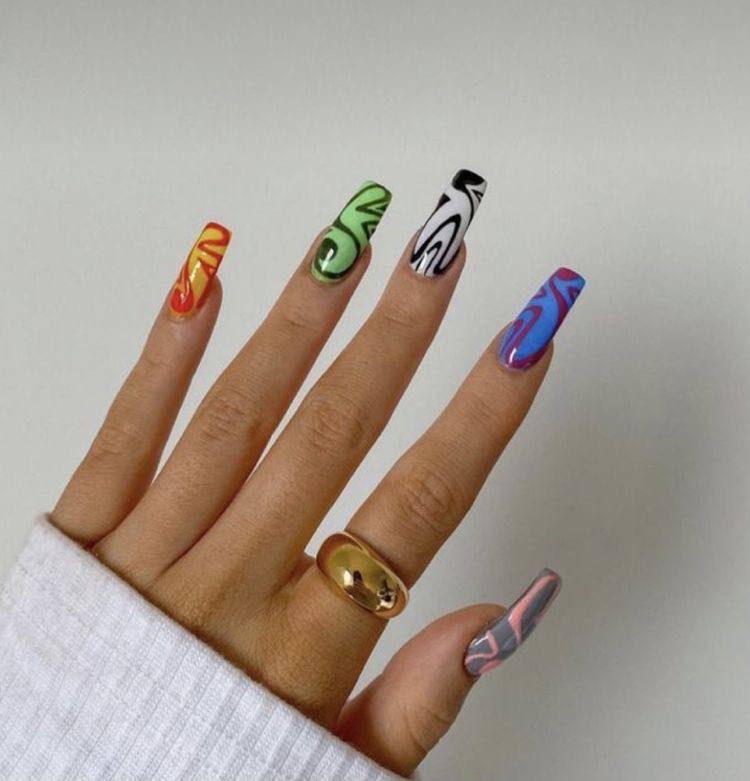
Electric negative space nails consist of high-pigment, neon colors applied to a sheer or entirely bare nail bed. Unlike a traditional manicure that covers the entire nail plate with opaque color, this technique relies on the “negative space”—the natural clarity of your nail or a translucent base coat—to create the design. This results in sharp, graphic lines, such as asymmetrical swirls, modern French tips, or geometric arcs, that appear to float above the nail. The finish is typically high-shine, using clear gel or a glossy top coat to emphasize the contrast between the vivid pigment and the natural nail.
Behind the Trend
For much of the recent past, the manicure landscape has been dominated by the “clean girl” aesthetic—a movement defined by milky whites, sheer pinks, and ultra-subtle nudes that suggest a sense of effortless, polished minimalism. While that look is undeniably sophisticated, there is a growing desire for something more expressive, something that breaks the silence of neutral palettes. This shift toward Electric Negative Space is a visual manifestation of “dopamine dressing,” a concept where color is used intentionally to boost mood and personal expression.
Where the “milky manicure” aims to blend in, this trend aims to stand out through clever use of light and shadow. It provides the brightness of a neon trend without the heaviness of a fully coated, solid-color nail. By leaving parts of the nail bare, the design feels lighter and more breathable, making it an ideal choice for the transition into warmer months when your wardrobe begins to incorporate lighter fabrics and more adventurous hues. There is also a subtle nod to the graphic, pop-art sensibilities of the late nineties, evoking a sense of playful energy that feels both nostalgic and entirely modern.
How to Get Electric Negative Space Nails
Achieving this look requires a steady hand and a focus on precision, but the result is far more striking than a standard application. You should begin with a meticulous preparation of the nail plate. Ensure your cuticles are hydrated and your nail surface is buffed smooth to create a seamless canvas. Start by applying a thin layer of a clear base coat. This is a crucial step, as the base coat provides a smooth surface for the design and prevents the neon pigment from staining the natural nail.
Once your base is set, you will need a high-pigment neon gel or a highly opaque liquid polish in a shade that feels particularly summery, such as electric orange, lime green, or hot pink. To create the graphic shapes, you should use a fine-tipped liner brush or a striper brush. This specific tool is essential; a standard nail polish brush is too wide and will make the negative space look messy rather than intentional. Dip the tip of the liner brush into your neon pigment and practice your stroke on a piece of paper first to gauge the pressure required. For a classic modern French look, draw a thin, crisp line following the curve of your free edge. For a more whimsical version, allow the brush to sweep in long, fluid swirls across the center of the nail, leaving plenty of the clear base visible.
When working with neon pigments, remember that two thin, precise coats will read more true-to-trend than three thick layers. Attempting to build opacity too quickly can lead to pooling, which ruins the sharp edges that make this trend so effective. Once your designs are dry or cured, finish with a generous layer of a high-shine clear top coat. This seals the pigment and gives the entire manicure a glass-like appearance, making the colors look even more luminous against the clear parts of the nail.
If you want to take this look to the next level, consider adding a touch of texture. Small, clear or iridescent rhinestones placed strategically at the base of the nail or along one of your neon lines can add a sense of luxury and dimension. For a more monochromatic approach, you can experiment with a chrome powder rubbed over the neon lines to create a metallic, futuristic effect that catches the light with every movement of your hands.