Try the Butterfly Nude Manicure for the Sweetest Spring Look
We’ll be wearing it all season.
The light is low and honey-colored, catching the edges of new leaves in a garden just as the temperature begins to rise. There is a specific kind of quiet that only exists in these early spring moments—the sound of a distant bee, the feeling of the sun warming your shoulders, and the visual softness of everything turning a more vibrant, living shade of green. It is a time of emergence and lightness, where the air feels less heavy and everything seems to be in a state of gentle motion.
You likely aren’t sitting in a sun-drenched meadow right now, perhaps you are reaching for a coffee or typing at a desk, but you can still carry that sense of seasonal transition with you. A manicure can act as a small, personal anchor to that feeling of renewal, bringing a bit of that bright, airy energy to your everyday movements.
What Are Butterfly Nude Nails?
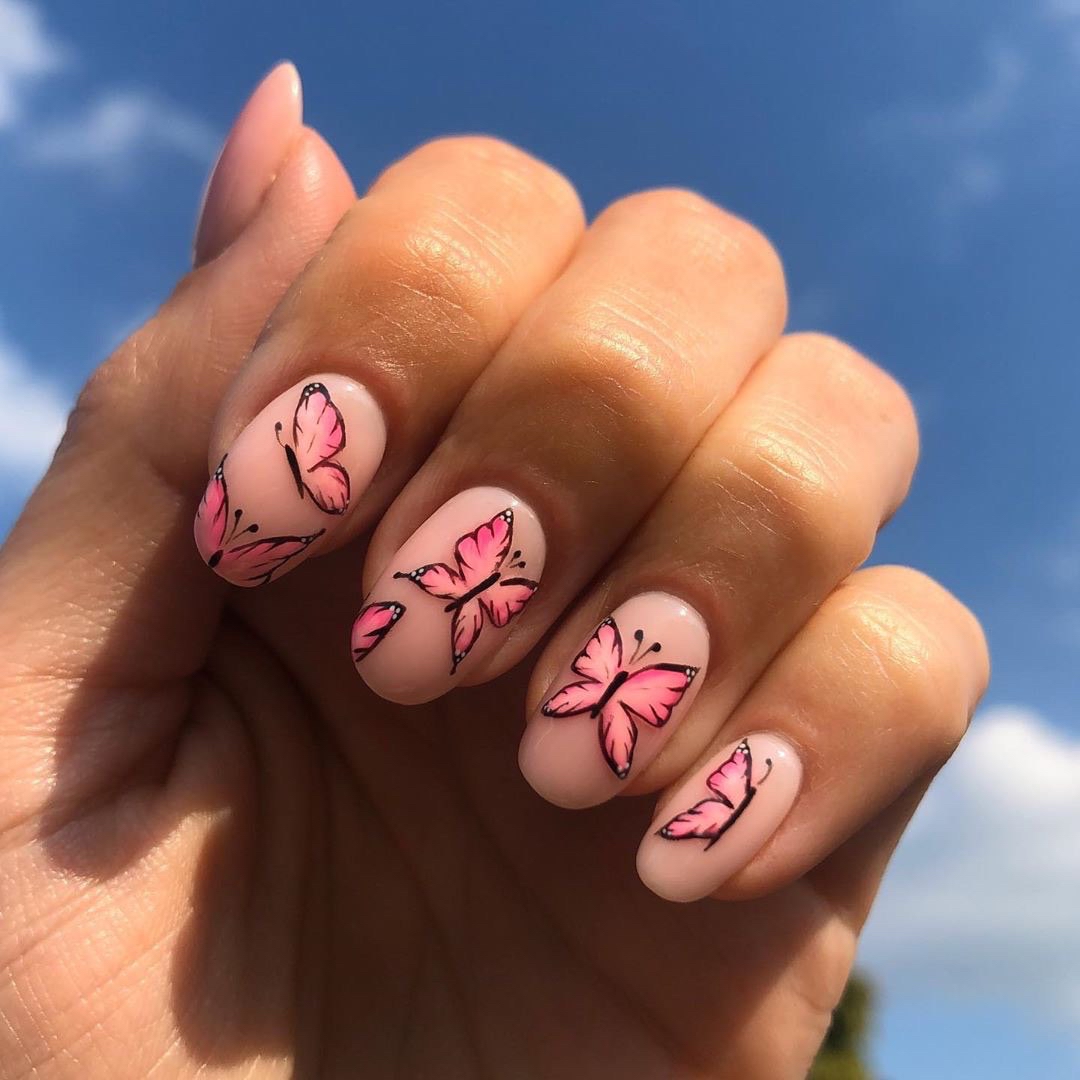
Butterfly Nude nails consist of a semi-translucent, pale pink base that mimics the natural tone of the nail bed while providing a polished, uniform finish. The nails are shaped into a soft almond silhouette, tapering gently toward a rounded tip. The focal point of the look is the hand-painted butterfly motifs scattered across the nails. These butterflies are rendered in a saturated, warm pink and are defined by fine, crisp black outlines, giving the delicate wings a sense of structure and lifelike detail against the sheer background.
Behind the Trend
This aesthetic resonates because it finds the middle ground between two polarizing nail movements. On one side, there is the “clean girl” aesthetic, which favors ultra-minimalism and almost invisible color. On the other, there is the maximalist trend of heavy 3D charms and loud, neon palettes. Butterfly Nude nails offer a way to embrace artistry and whimsy without feeling overwhelming or heavy. They provide a sense of movement and life that feels organic rather than manufactured.
The use of negative space—or in this case, the “positive” space of the sheer base—allows the design to breathe. It feels less like a sticker applied to the nail and more like a natural occurrence, similar to how a butterfly might land on a pale petal. This makes the look feel timeless and effortless, leaning into a soft, romantic mood that feels particularly suited to the changing seasons.
How to Get Butterfly Nude Nails
To begin, you will want to focus on creating a seamless, clean foundation. Start with well-prepped nails, ensuring the cuticles are pushed back and the surface of the nail is smooth. The key to this look is the base color; you will need a sheer, milky pink polish. This isn’t a heavy, opaque pigment, but rather a translucent shade that allows a hint of your natural nail to show through. Apply two very thin coats of this polish rather than one thick one. This prevents any streaking and maintains that delicate, “barely-there” quality that makes the butterflies pop.
Once your base is completely dry and set, you can move into the design phase. For the butterfly wings, you will want a medium-toned pink polish that has enough opacity to stand out against the nude base but isn’t so dark that it looks heavy. Instead of trying to paint a perfect butterfly in one go, start by mapping out the general shape of the wings using a small, round brush. Think of these as soft, petal-like shapes. It is better to layer the color in thin, controlled strokes to build the saturation, rather than trying to cover the area with a single, heavy drop of polish.
The most technical part of this process is the linework. To achieve the sharp, defined edges seen in the reference, you will need a very fine-tipped detail brush and a black polish. The black should be used sparingly to outline the pink shapes you have just created. As you work, remember that the lines do not need to be perfectly symmetrical; in fact, a slight variation in the shape of the wings can make the butterflies look more natural and less like a repetitive pattern. Work with a light touch, pulling the brush along the edge of the pink color to create a crisp boundary. If a line becomes too thick, you can use a clean brush dipped in a tiny amount of clear base coat to “erase” the excess before it sets.
The final step is to seal the work with a high-shine, glossy top coat. This is crucial for two reasons: it protects the delicate hand-painted details from chipping and it gives the nails a glass-like finish that enhances the translucency of the base. Apply the top coat in long, even strokes, being careful not to “flood” the painted areas, which could cause the black lines to bleed into the pink. A single, smooth layer will catch the light beautifully, making the butterflies appear as though they are resting on a shimmering surface.
If you want to take this look into the height of summer, consider swapping the soft pink for a bright coral or a vibrant lavender. You can even add a tiny touch of iridescent shimmer to the wings to mimic the way light hits a real butterfly in the sun.