Makartt Rhinestone Glue and 3D Gel Review: Achieving Professional 3D Nail Art at Home
If you have been following nail trends on Instagram or TikTok lately, you have likely seen the rise of “maximalist” nails—think intricate 3D flowers, raised swirls, and heavy gemstone placements. For a long time, this level of detail was reserved for high-end salons, but the availability of professional-grade sculpture gels has changed the game for DIY enthusiasts. Today, I am diving deep into the Makartt Rhinestone Glue and 3D Gel Sculpture Gel duo to see if these tools actually deliver that high-relief, salon-quality finish.
Key Features
This duo is designed to handle two different but complementary tasks: securing embellishments and creating structural art. Rather than a one-size-fits-all approach, Makartt provides two specialized formulas.
Makartt Rhinestone Glue
This product is specifically formulated for adherence. With a generous 30g tube, it is designed to act as the anchor for your nail art. Whether you are using small crystals or larger, heavier charms, this glue is intended to provide a secure bond that prevents your embellishments from popping off prematurely.
Makartt 3D Gel Sculpture Gel
The sculpture gel is where the creativity happens. This is a “No Wipe” formula, meaning that once it is cured under a lamp, you aren’t left with that annoying sticky inhibition layer. It is a high-viscosity gel, meaning it stays where you put it rather than leveling out or running, which is essential for building height and texture on the nail.
Design & Application/Wear Quality
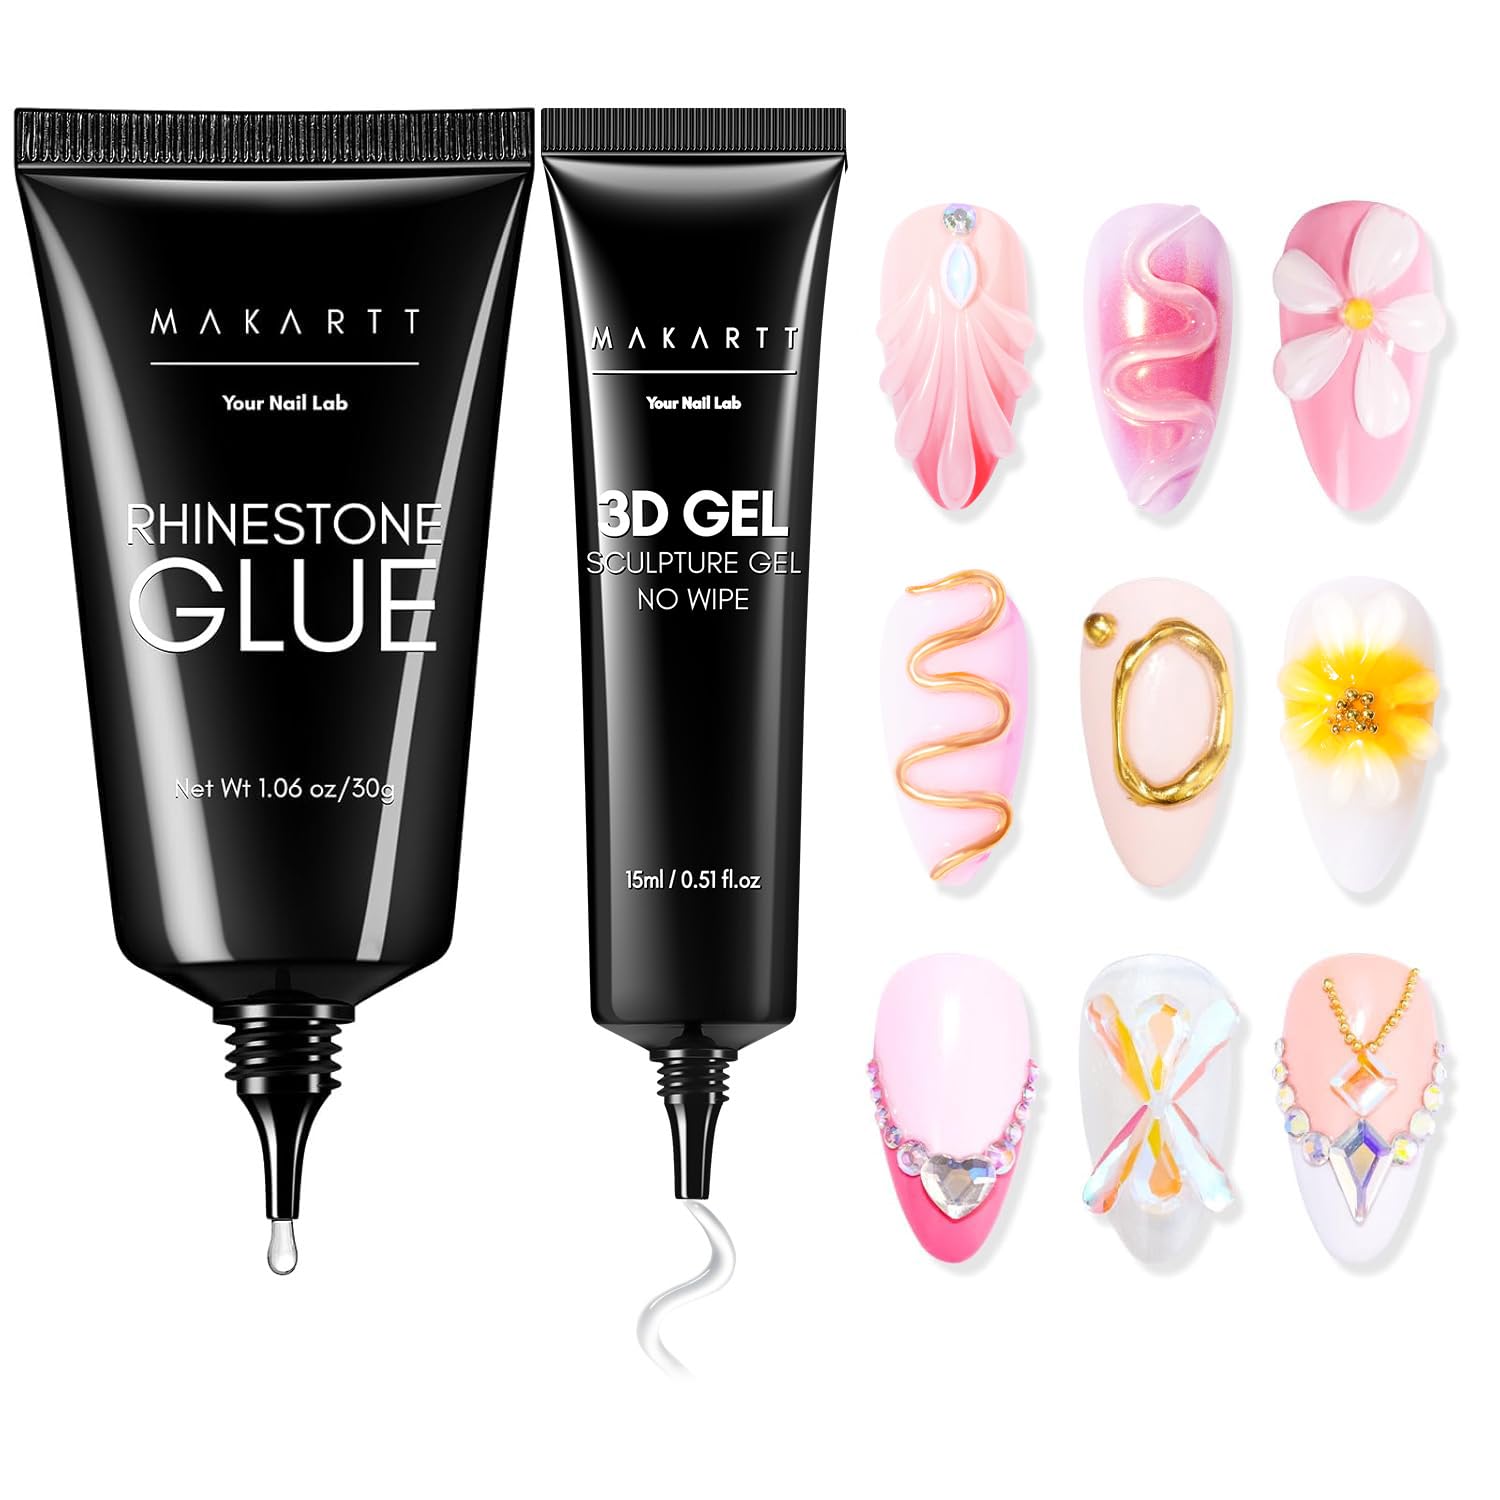
Looking at the packaging and the results shown in the product imagery, the first thing that stands out is the precision. Both the Rhinestone Glue and the 3D Gel come in tubes with very fine, tapered nozzles. This is a critical design choice; when you are placing a tiny rhinestone or sculpting a delicate petal of a flower, you cannot afford to have huge globs of product landing on the nail.
In terms of application, the 3D Sculpture Gel behaves more like a putty than a traditional polish. This allows for “sculpting”—the ability to pull the gel into peaks, swirls, or rounded shapes that hold their form during the curing process. The visual examples provided show a wide range of versatility, from gold-toned metallic swirls to thick, opaque white floral structures. The fact that it is a “no wipe” gel streamlines the process significantly, allowing you to move directly from curing to adding a top coat or leaving the sculpture as is.
As for the Rhinestone Glue, the focus is clearly on stability. The images demonstrate its ability to hold substantial weight, such as large heart-shaped gems and intricate metal chains, without the pieces shifting. For a beauty analyst, this indicates a high-tack formula that bridges the gap between a standard base coat and a heavy-duty adhesive.
What Customers Are Saying
After synthesizing feedback from users across various beauty forums and retail platforms, a clear consensus emerges regarding the performance of these two products. The most recurring theme is the impressive “staying power” of the rhinestone glue. Many users have noted that their gems remain intact for weeks, even with daily wear and tear, which is often the biggest pain point with DIY nail art.
Regarding the 3D Gel, the general sentiment is one of appreciation for its thickness. Users frequently mention that the gel does not “bleed” or flatten out before they can get it under the UV/LED lamp. This makes it a favorite for those who are not professional artists but want to attempt 3D shapes. There is a general agreement that the “no wipe” feature is a major convenience, saving time and reducing the mess associated with isopropyl alcohol clean-ups.
A few common critiques mention a learning curve. Some beginners found it challenging to manipulate the thick consistency of the sculpture gel at first, noting that it requires a bit of practice to get the shapes perfectly smooth. However, most of these users eventually found that using a fine detailing brush helped them master the application.
Pros & Cons
- Pros:
- High-viscosity formula prevents 3D shapes from flattening.
- Precision nozzles allow for detailed, controlled application.
- No-wipe finish on the sculpture gel saves time and effort.
- Strong adhesive properties for heavy charms and rhinestones.
- Versatile enough for various styles, from “coquette” florals to modern abstract lines.
- Cons:
- The thickness of the sculpture gel may require a learning period for novices.
- Requires a UV/LED lamp for curing (not included).
- The high density of the gel can be difficult to remove without filing.
Who It’s For
This kit is ideal for the “maximalist” nail lover. If you enjoy the Japanese or Korean nail art aesthetics—characterized by 3D textures, “blob” art, and heavy embellishments—this is a perfect addition to your toolkit. It is also highly suited for aspiring nail technicians who want to practice sculpting techniques without investing in an entire professional salon line.
On the other hand, if you prefer a very natural, flat, or minimalist look, these products might be more than you need. These are specialized tools for texture and adornment, not for everyday basic manicures.
Final Verdict & Tips
Based on the product specifications and the overarching user experience, the Makartt Rhinestone Glue and 3D Gel duo offers excellent value for anyone looking to elevate their nail game. The separation of the adhesive and the sculpture gel ensures that you aren’t compromising bond strength for artistic flexibility. While there is a slight learning curve to sculpting, the results are professional and durable.
Pro Tips for Best Results:
- Prep is Everything: Before applying the rhinestone glue, ensure the nail surface is completely free of oils. A quick swipe of alcohol or a nail dehydrator will ensure your gems stay put for much longer.
- Use a Detailing Brush: While the nozzle is great for placing drops, use a tiny nail art brush to shape the 3D Gel. Dip the brush into the gel and gently pull it into the desired shape before curing.
- Flash Cure: If you are building a complex 3D shape, try “flash curing”—putting your hand under the lamp for just 5-10 seconds to set the shape, then continuing to sculpt before doing a full cure.
- Avoid Over-Applying: Because the sculpture gel is so thick, a little goes a long way. Start with a small amount to avoid creating lumps that are difficult to file down later.
- Seal the Edges: For rhinestones, use the glue specifically under the stone, but consider using a clear top coat around the edges of the gem (without covering the top of the stone) to “lock” it in place and prevent snagging on hair or clothes.