The Sophisticated Appeal of Lipstick Print Nail Art
There is a distinct, quiet confidence in wearing a manicure that tells a visual story. The intersection of classic beauty signatures—specifically, the texture of a rich lipstick and the clean architecture of modern nail sculpting—has materialized in one of the most compelling trends of the season. Lipstick print nail art moves away from predictable, high-shine finishes, opting instead for a textured, tactile contrast that feels both nostalgic and avant-garde.
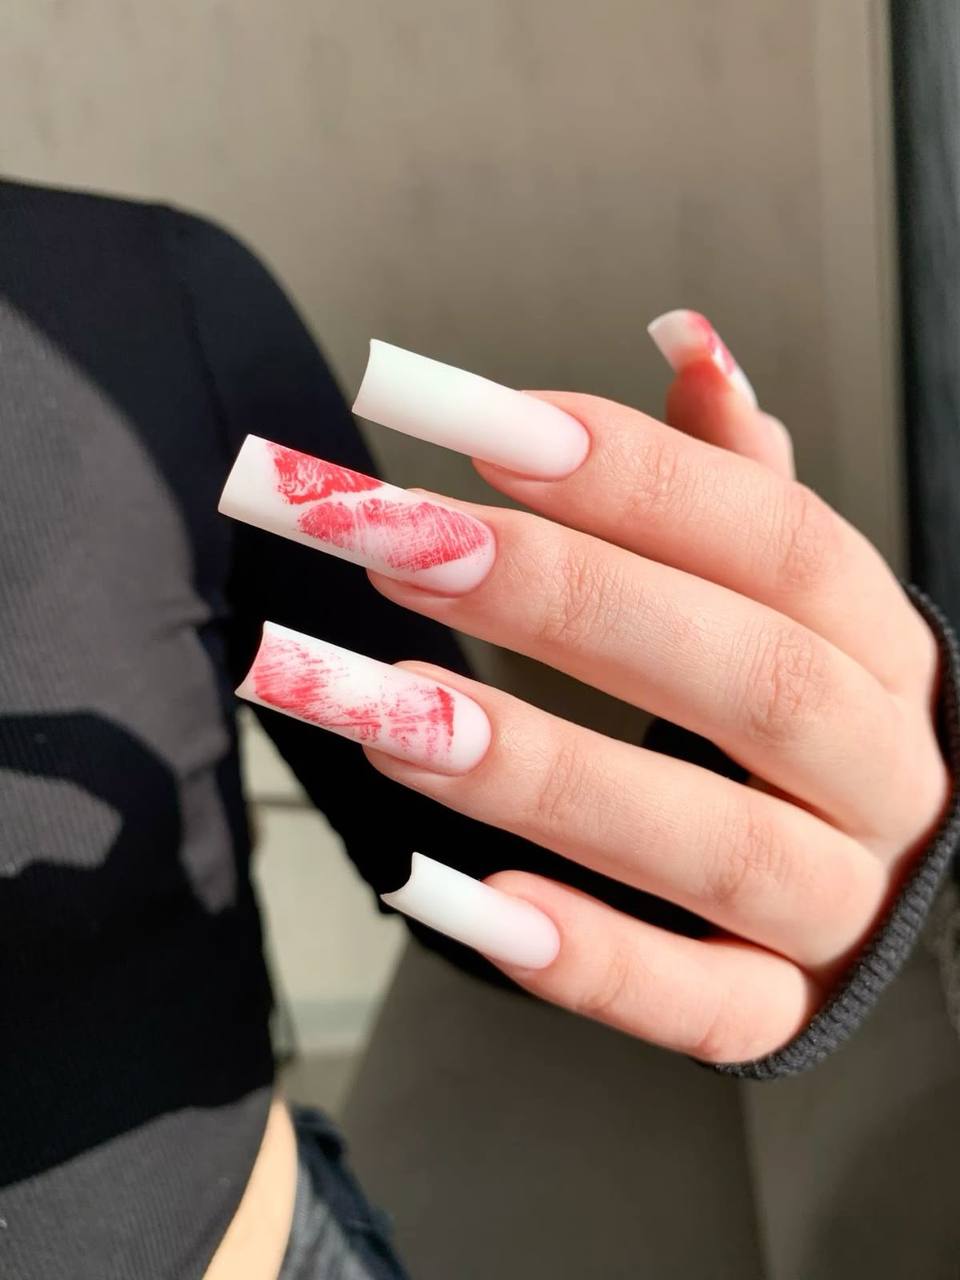
It is a design that relies heavily on precision. When rendered on a long, square canvas with a matte finish, the contrast between a milky, semi-translucent base and a highly detailed crimson print mimics the artistic look of a fine letterpress print. This aesthetic succeeds because it balances the clean structure of advanced nail engineering with the organic, textured smudge of a real cosmetic application.
Deconstructing the Structure: Milky Bases and Square Architecture
To execute this look successfully, the foundation must be structurally sound and color-balanced. The base is not a stark, chalky white, which can appear flat and clinical. Instead, it utilizes a milky, semi-sheer white gel or acrylic that allows a soft filtration of light. This semi-translucent quality gives the nail depth, serving as a clean, sophisticated backdrop for the artwork.
The silhouette relies on a straight-walled square shape with an exaggerated C-curve. Achieving this requires precise form placement during the extension process, ensuring that the sidewalls run parallel from the lateral folds to the free edge without flaring. Proper apex placement—the thickest point of the gel or acrylic application—is critical here. Because the length is substantial, the apex must be positioned to absorb daily impact, preventing fractures while maintaining a slender, elegant profile.
If you prefer a more conservative length, this design translates beautifully to a short squoval or a tapered coffin. Regardless of the length you choose, keeping the edges crisp and the surface smooth is paramount; any unevenness in the gel application will be magnified once the matte topcoat is applied.
Mastering the Stamp: How to Recreate the Lip Print Texture
The defining feature of this manicure is the incredible realism of the lip print, complete with the natural vertical lines and creases of skin texture. To replicate this level of detail at home or to describe it to your nail technician, you must look beyond basic hand-painting with a thick brush, which often results in a heavy, cartoonish silhouette.
Instead, high-quality silicone stamping plates offer the most reliable method for transferring fine, microscopic details. Begin by selecting a stamping polish with a high pigment density in a classic blue-toned red or a rich crimson. Apply a small amount of polish to the plate, scrape away the excess at a forty-five-degree angle, and gently roll a clear silicone stamper over the design. The transparency of the stamper allows you to position the print accurately on the middle and ring fingers, ensuring the kiss mark curves naturally along the nail plate.
For those who prefer a hand-painted approach, a dry-brush technique is your best option. Using a fine-detail liner brush and a highly pigmented gel paint, draw the basic outline of the lips. Before curing, use a dry, clean brush with stiff bristles to gently swipe vertical lines through the wet gel, mimicking the natural texture of lips. Once you are satisfied with the detail, cure under an LED lamp.
The Velvet Finish and Color Customization
The final aesthetic polish comes down to the choice of topcoat. While a glossy finish is a traditional choice, a velvet matte topcoat transforms this look into an editorial statement. The matte finish removes all glare, allowing the eye to focus entirely on the depth of the milky base and the intricate details of the red print.
When selecting your red polish, consider your skin undertone. A cool, blue-red stamp offers a classic, vintage-inspired contrast against a cool-toned milky white base. If you have warm or olive undertones, a rich terracotta or brick red stamp paired with a soft cream base creates a harmonious, warm look. For a subtle variation, you can swap the classic red for a deep burgundy, a rich plum, or even a muted chocolate brown, transforming the design into a sophisticated autumnal look.
Maintaining Matte White and Long-Term Wear
Light-colored matte manicures require a specific care routine to keep them looking pristine. Matte topcoats are inherently more porous than their glossy counterparts, making them susceptible to staining from denim dyes, cosmetics, and daily oils.
To protect your investment, establish a daily cuticle oil barrier. Applying a high-quality jojoba or almond-based cuticle oil not only hydrates the surrounding skin but also creates a mild hydrophobic barrier on the nail plate. If you notice any graying or staining on the matte surface, do not scrub aggressively. Instead, saturate a lint-free wipe with seventy-percent isopropyl alcohol and gently buff the surface to lift away surface oils and dirt.
Additionally, because square nails feature sharp, unprotected corners, they are prone to minor chipping along the free edge. Weekly filing with a high-grit glass nail file will keep the edges smooth and prevent snags, preserving the architectural integrity of your square shape between salon visits.
Whether you choose to wear this design as an expressive statement for a special occasion or as a signature style that defies seasonal trends, its appeal lies in its balance of strength and softness. By mastering the structural foundation and embracing the textured realism of the print, you can wear a look that feels intensely personal, highly curated, and effortlessly polished.