Try the 3D Jelly Wave Nail Trend for the Dreamiest Spring Manicure
A tactile twist on your seasonal palette.
There is a specific kind of light that only exists in the late afternoon of a coastal spring. It is the light that catches the crest of a slow-moving tide, turning the salt water into a sheet of moving silk. You watch as the ripples catch the sun, creating a series of shifting, translucent ridges that appear to glow from within, as if the water itself is holding onto the warmth of the day. The textures are soft, the colors are muted, and everything feels fluid and effortless.
You likely aren’t standing on a shoreline right now, perhaps sitting instead at a desk or catching a moment of quiet in a sunlit kitchen. However, you can carry that sense of rhythmic, liquid light with you through a new approach to your manicure. This season, the focus is shifting away from the flat, static surfaces of recent years and moving toward something far more kinetic and sculptural.
What Are 3D Jelly Wave Nails?
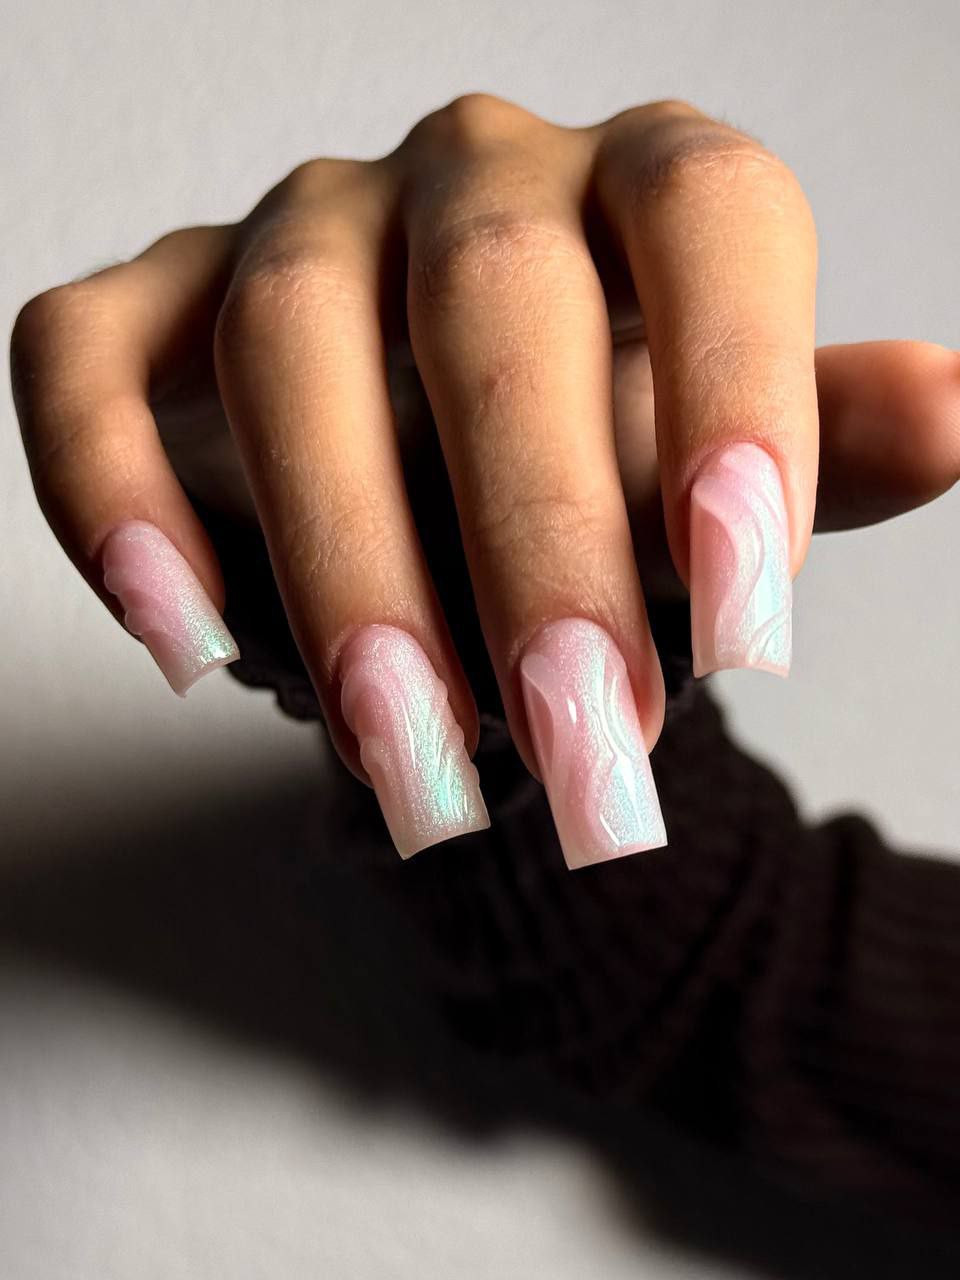
3D jelly wave nails are defined by a combination of translucency and physical topography. This technique uses a sheer, high-pigment jelly polish as a base—often in shades of peach, pale pink, or seafoam—to create a depth that mimics stained glass or heavy silk. On top of this semi-transparent layer, a thick, clear builder gel is applied in raised, undulating lines. The result is a tactile, sculptural finish that creates shadows and highlights as your hands move, mimicking the organic patterns found in water or polished sea glass.
Behind the Trend
For much of the last few years, the beauty world has been leaning into the “clean girl” aesthetic: a look defined by minimalist, single-color manicures and a polished, almost clinical perfection. While that approach offered a sense of calm, it often felt somewhat two-dimensional. 3D jelly wave nails represent a pivot toward “sensory beauty”—a desire for manicures that don’t just look beautiful, but look like they have weight, movement, and life. This trend moves the conversation from mere color to the interplay of light and shadow.
There is also a subtle touch of nostalgia at play here. The pearlescent, undulating shapes evoke the aesthetic of early 2000s futurism, but stripped of the neon intensity and replaced with a sophisticated, organic palette. It feels like a modern nod to the ocean, reminiscent of the way light plays on a seashell or the rhythmic patterns of sand under a receding wave. By moving away from the starkness of matte finishes or the standard shine of a flat top coat, this trend offers a more expressive way to interact with your personal style, allowing your nails to become small, wearable pieces of art.
How to Get 3D Jelly Wave Nails
To achieve this look, you will first need to start with a foundation of translucency. Select a jelly polish in a soft, spring-appropriate shade like a milky rose or a pale apricot. Because jelly polishes are inherently sheer, the key is to apply two thin, even coats. Applying more than that can lead to an opacity that ruins the “glassy” effect you are aiming for. Once your base color is cured and smooth, you are ready to build the texture. You will need a clear builder gel, which is a thicker, more viscous category of product designed to hold its shape without leveling out completely flat.
Using a fine liner brush, you will begin to “draw” your waves directly onto the base color. Rather than painting a flat layer, you want to pick up a bead of the builder gel and drag it across the nail in a continuous, rhythmic motion. Think of it as sculpting rather than painting. You might create long, sweeping curves that travel from the cuticle to the tip, or shorter, tighter ripples that mimic the surface of a pond. If you find the gel is moving too much, you can pause to cure each section individually, allowing you to build up the height of the ridges for a more dramatic effect. Once your patterns are set, finish with a high-shine top coat to unify the textures and enhance the way the light travels across the raised surfaces.
If you want to take this look into a more maximalist direction, consider adding tiny, iridescent micro-pearls or dried botanical elements into the clear gel ridges before you cure them. This adds an extra layer of detail that makes the manicure feel even more intentional and artisanal.