Try the 3D Jelly Heart Nail Trend for the Sweetest Spring Manicure
We’ll be wearing it all season.
Think of the first warm Saturday afternoon in April, walking through a local flower market with an iced lavender latte in hand. There is a light breeze carrying the scent of fresh tulips, and you spot a vintage glass dish filled with those translucent pastel candies you used to love as a kid. They are slightly matte on the outside but catch the spring sunlight with a watery, soft glow that feels both nostalgic and incredibly fresh.
While you might still be waiting for the outdoor temperatures to catch up to your spring wardrobe dreams, you can bring that exact sense of lighthearted, tactile optimism to your fingertips right now. This season is all about embracing touchable texture, and the newest manicure style to take over our feeds does exactly that with a playful, three-dimensional twist.
What Are 3D Jelly Heart Nails?
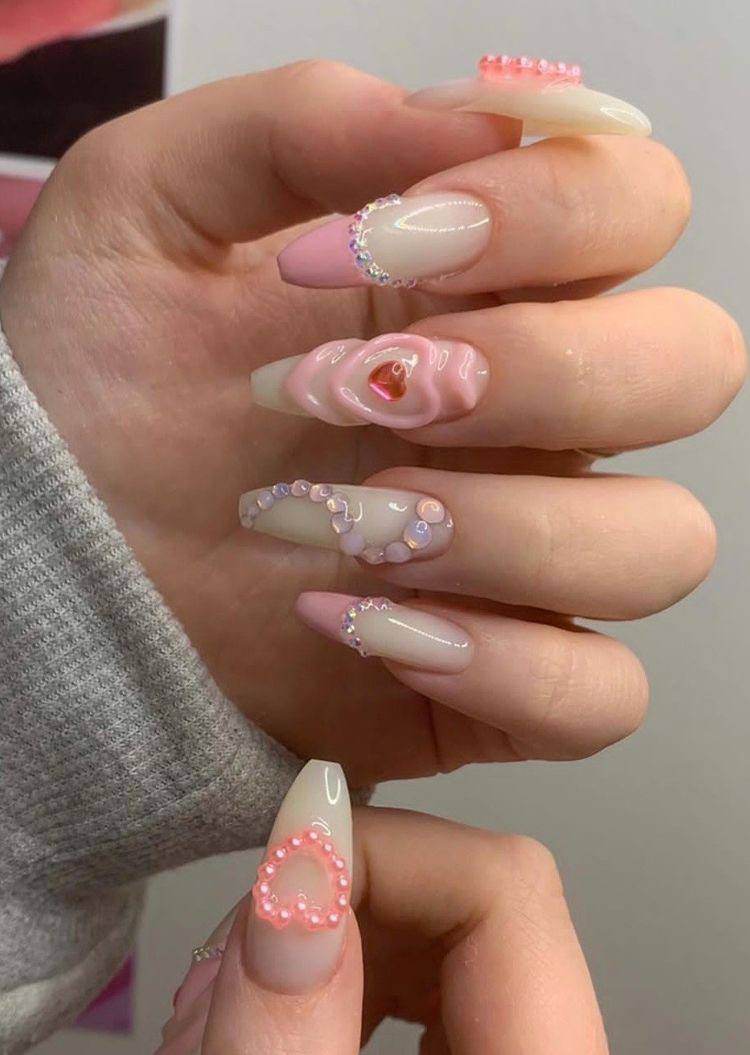
This manicure style combines a sheer, cloud-like base with raised, sculptural elements made from thick clear gel. The finished look features tactile, bubble-like hearts, ribbons, or droplet shapes tinted in soft pastel hues like blush pink, lavender, and butter yellow. It relies on a high-shine, glassy finish that makes the raised designs look like drops of liquid glass or retro gel candies resting directly on the nail plate.
Behind the Trend
After seasons dominated by flat, minimalist manicures like the simple sheer nude or the classic crisp French tip, there is a collective craving for texture and playful self-expression. This style taps into a wave of early-2000s nostalgia, calling to mind the tactile joy of jelly sandals, puffy stickers, and vintage glass beads, but translates them into a modern, artistic medium. Unlike the heavy chrome and dark metallic finishes of the winter months, this look feels light and airy. It offers a way to wear pastel shades without feeling too sweet, thanks to the sculptural, modern art finish of the gel.
How to Get 3D Jelly Heart Nails
To bring this look to life, you want to start with a clean nail prepped with a sheer, milky-white or soft pink base polish. Applying two thin coats of this base rather than one thick layer builds a believable, cloud-like depth that mimics the natural nail bed while evening out any slight discoloration. Once your base is fully set, you will need a high-viscosity builder gel or a dedicated 3D sculpting gel. This specific category of product has a thick, honey-like consistency that holds its shape perfectly without running or self-leveling before it is cured under a lamp.
Using a fine detail brush, scoop a small bead of the clear gel and place it in the center of the nail, gently pulling it into a heart shape with the tip of the brush. If you want to add a hint of color, you can mix a tiny drop of a pastel gel polish into your clear builder gel before application to maintain that translucent, syrup-like quality. Once your shapes are cured, finish the entire nail with a generous layer of an ultra-glossy top coat, making sure to seal carefully around the edges of the raised designs so they catch the light from every angle.
The Next-Level Variation
If you want to customize this look further, try embedding tiny flat-backed pearls or micro-rhinestones into the wet sculpting gel before you cure the shapes. This adds an extra layer of texture and a romantic, vintage-inspired charm that keeps the manicure feeling entirely unique.